
This post appeared originally in our sysadvent series and has been moved here following the discontinuation of the sysadvent microsite
Sometimes you need just a little something on your network to do a simple task. Perhaps you need a small router, a firewall or load balancer. Currently, the most popular option is to deploy a little Linux server. There is a downside though, a Linux is rather heavy. It requires quite a bit of disk and memory and there is the never ending stream of updates.
For those who don’t know what a unikernel is here is a very short primer. The idea is that you inject the operating system into the application itself. So the build system will add drivers, network stack, boot-loader, memory management and other operating system functions to your application, transforming it into a universal virtual machine that just need a hypervisor to run.
Unikernels have come up as an intriguing alternate operating system the last couple of years. The use of unikernels haven’t been exploding, however. Most people agree that Unikernels are interesting, but the use-cases haven’t been obvious. I think of one the factors keeping unikernels back are the strong ties to language runtime they are written in. Everything is code. So if the unikernel is written in Haskell, OCaml or C++ you’d have to configure it using Haskell or C++. That is now changing - at least for IncludeOS.
IncludeOS is a performance-oriented unikernel written in C++. The lean language runtime stemming from the zero-overhead principle means the overhead of the system itself is as lean as possible. IncludeOS applications are small, fast and secure. And now they are also easy to use. Let me snow you how:
The NaCl language
We’ve developed a configuration language for IncludeOS, called NaCl - Not another Configuration Language. It allows you to define a routing firewall with IncludeOS. The configuration looks like this:
Iface outside {
        address:        10.0.0.2,
        netmask:        255.255.255.0,
        gateway:        10.0.0.1,
        index:          0
}

Iface inside {
        address:        192.168.0.1,
        netmask:        255.255.255.0,
        index:          1
}
Here we defined a regular network card. “Index” is used to identify the networking card, as there might be several. In the future we’ll add the option of designating a card using the MAC address, that’ll make things a bit clearer. Stay tuned.
Adding a configuration file
In order to compile a IncludeOS application with a NaCl configuration you just add a “nacl.txt” to the folder containing the service. The build system will look for such a file and transpile and add it automatically if it can.
Back to our goal of creating a firewall. In addition to interfaces we need a routing table. IncludeOS requires you to define the routing table explicitly; it doesn’t assume you necessarily want to route to all available interfaces. It is a bit more work to set up, but it’ll keep you from routing packets onto your management network if IncludeOS has an interface on that network. So, let’s look at the routing table, which is defined as an object.
Gateway myGateway {
        forward: firewallchain,
        outside_route: {
                net: 10.0.0.0,
                netmask: 255.255.255.0,
            Iface: outside
        },
        inside_route: {
                net: 192.168.0.0,
                netmask: 255.255.255.0,
                iface: inside
        },
        default_route: {
                net: 0.0.0.0,
                netmask: 0.0.0.0,
                nexthop: 10.0.0.1,
                iface: outside
        }
}
Here we define three routes. One for each interface and also a default route, through a router on the “outside” network. We also connect a firewall chain to the router. Every packet forwarded is put through this chain.
A firewall needs to be able to log stuff. IncludeOS does have its own log but getting to that log can be a bit cumbersome. We do support syslog, so in this example we’ll use it to log stuff.
Syslog settings {
  address: 192.168.0.231,
  port: 6514
}
Now we can use the syslog() function to send syslog messages to this host. Let us continue and define some hosts and networks.
bastion_host: 10.55.1.1
allowed_services: [80,443]
allowed_hosts: [192.168.0.10 - 192.168.0.200]
This is pretty straightforward. You can define constants like this. The input is pretty flexible and will accept ranges, lists, and CIDR-style network definitions. You can tell it looks a bit like JSON, the square brackets indicate lists and curly brackets showing an object.
Adding firewall rules
Now we need to look at what the firewall look like.
Filter::IP firewallchain {
    if (ct.state == established) {
      syslog(INFO, "Accepting packet from an already established connection (from ", ip.saddr, ")")
        accept
    }

    if (ip.saddr == bastion_host) {
        accept
    }
    Filter::TCP {
            if (ip.daddr in allowed_hosts and tcp.dport in allowed_services) {
          syslog(INFO, "New connection established (from ", ip.saddr, ")")
                accept
            }
    } // end TCP

    syslog(WARNING, "Dropping packet from saddr ", ip.saddr," to ",ip.daddr)
    drop
}
As you can tell we support connection tracking. The first thing we do is to check if the connection is established. If it is we let further traffic on the connection go through.
We then allow traffic from our bastion host go through.
Next we start firewalling TCP. We define a sub-filter for TCP which allows us to inspect TCP properties. Inside Filter::TCP dport and other TCP properties are available to us.
For a simple firewall, this is likely it. Now that we know what the configuration looks like let’s get this thing into production. :-)
First, we need to install IncludeOS. The recommended build system is Ubuntu 16.04, but later releases should work fine. CentOS/RHEL1 also works and most likely Debian as well. We could also build on MacOS but on MacOS we’ll need a bit more infrastructure in order to install the GRUB2 boot-loader onto the image. On MacOS we recommend using the Docker images.
We’ve written a blog post about how to use our docker images. The rest of the post assumes you are on Ubuntu and not using Docker.
git clone "https://github.com/hioa-cs/IncludeOS.git"
cd IncludeOS
git checkout dev
export INCLUDEOS_PREFIX=~/IncludeOS_install
./install.sh
export PATH=$PATH:$INCLUDEOS_PREFIX/bin
We need to checkout the dev branch. As of mid-December 2017, not everything has made it into the stable release yet. If you’re reading this in 2018 you can likely just follow the official release docs to install.
Next thing we need is a build the application. We’ll start with an empty directory. You’ll need a service.cpp so the build system knows what to build. Create a service.cpp with the following content:
#include <os>

int main(){
   printf("IncludeOS booted up\n");
}
Don’t be scared of the C code. We just need some minimal code to get the compiler to compile. I promise you won’t need any more C or C++ code. Save the file and type “boot .”. It’ll compile the service and boot it up and you’ll see output like this:
 IncludeOS v0.11.0-692-gf2d7c1a1 (x86_64 / 64-bit)
 +--> Running [ IncludeOS seed ]
~~~~~~~~~~~~~~~~~~~~~~~~~~~~~~~~~~~~~~~~~~~~~~~~~~~~~~~~~~~~~~~~~~~~~~~~~~~~~~~~
IncludeOS booted up
       [ main ] returned with status 0
Yay. You’ve just written a very minimal operating system. Hello World OS. Now let’s add firewalling capabilities to your operating system.
We’ll need to add network interface drivers. Open CMakelist.txt in your favorite editor. Find DRIVERS and comment in “virtionet”, which is our virtio networking driver. If you want to deploy on Vmware you can also add “vmxnet3” on a new line. Having both is not a problem.
Now, lets add the firewall. Copy all the NaCl configuration from this post. You can get the whole config here. Put it in a file called nacl.txt. Now, to validate the configuration, type “boot .” to see that the system compiles nicely. It should boot up but it’ll throw an exception as there is only one network interface define in the virtual machine. The boot command looks for a “vm.json” to configure the virtual machine. To have a virtual machine with two networking interfaces add a vm.json that looks like this:
{
  "net" : [
    {"device" : "virtio", "mac" : "c0:01:0a:00:00:2a"},
    {"device" : "virtio", "mac" : "c0:01:0a:00:00:3a"}
  ]
}
Now your firewall should boot up nicely. vm.json is only used by the “boot” command to configure Qemu.
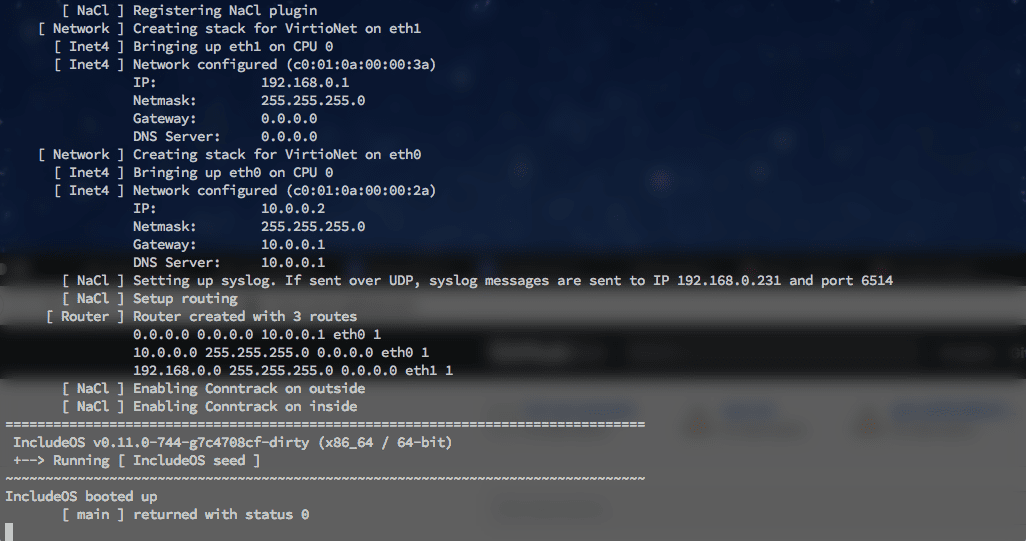
There is some output on the console that tells you how various bits of the OS are initialized.
Now, let’s get this thing booted up in a proper hypervisor. We want to add GRUB2 to the image. We have a helper script that will add the boot-loader to the image. The image resides in the build folder and is called seed.img (unless you changed the name in the CMake file).
${INCLUDEOS}/includeos/scripts/grubify.sh build/seed.img
This will create build/seed.img.grub
Now you have a virtual image that can be deployed on a hypervisor. It is a RAW disk image. Uploading it to OpenStack should be straight forward. If you want to convert it to a VMDK file for use on Vmware you can do so using qemu-img:
qemu-img convert -f raw -O vmdk build/seed.img.grub build/seed.vmdk
Now you have your VMDK file. In vmware, make sure the network adapter is a VMXNET3 adapter as we have no driver for the default (and slow) e1000 network interface.
Advanced firewalling
Pretty cool. You can also of course to more advanced firewalling. If you are into mangling packets and doing SNAT or DNAT that is rather simple. To do both DNAT and SNAT, similar to what would be a full proxy, you’ll need a couple of chains like this:
target: 192.168.0.54 // DNAT onto this host:
tport: 5001

Nat::IP mydnat {
    Nat::TCP {
       if (ip.daddr == outside.address and tcp.dport == tport ) {
            dnat(target)
      }
   }
}

Nat::IP mysnat {
    Nat::TCP {
        if (ip.daddr == target and tcp.dport == tport ) {
            snat(inside.address)
        }
    }
}
Now you’ll need to hook these chains onto the interfaces. We’ve used concepts and names similar to Linux Netfilter. The most significant difference is that we have a separate IP stack for each interface. So we hook the DNAT rule onto the outside interface and the SNAT rule onto the inside interface:
Iface outside {
    address:        10.0.0.2,
    netmask:        255.255.255.0,
    gateway:       10.0.0.1,
  prerouting:     mydnat,
    index:          0
}

Iface inside {
  address:        192.168.0.1,
    netmask:        255.255.255.0,
    postrouting:    mysnat,
    index:          1
}
How is performance, you might ask. So far we’ve seen a performance that is roughly 15% faster than Linux. As the number of firewalls rules grow, we expect the performance gap to increase. Further research into this will likely be taken on by one of our research partners, the Oslo Community College during 2018. Follow the IncludeOS blog to stay tuned.
If you want to know more NaCl is pretty well documented - NaCl Documentation.
If you have any trouble, we’d love to help. The easiest way to get help is to go to Gitter. You can also find us on GitHub.
Good luck!
-
Please install net-tools on these platforms. We currently rely on good old “ifconfig” to configure the network. ↩
Just-Make-toolbox
make is a utility for automating builds. You specify the source and the build file and make will determine which file(s) have to be re-built. Using this functionality in make as an all-round tool for command running as well, is considered common practice. Yes, you could write Shell scripts for this instead and they would be probably equally good. But using make has its own charm (and gets you karma points).
Even this ... [continue reading]